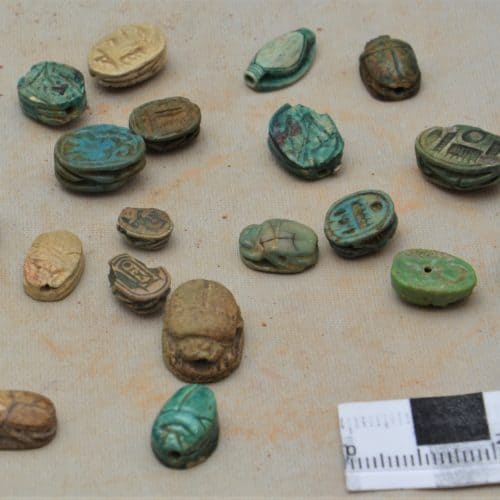
Cabinets of Curiosity activity 6: Ancient Egyptian scarabs
Children investigate scarab beetle amulets as a starting point to a wider exploration of Ancient Egypt, religious beliefs, death and mummification. They then create their own replica scarab using self-hardening clay.
Learning objectives
Increased knowledge and understanding of life in Ancient Egypt, mummification, the sacred scarab beetle and scarab amulets.
Curriculum links
KS1-2 History (Ancient Egypt)
KS1-2 Art and Design (create a scarab amulet)
Bring up the photo of the scarab beetle amulets in Learn with Objects A Cabinet of Curiosities 11: amulets on the whiteboard. Ask the following questions:
- What animals are they?
- What do you think they are made from?
- What’s the strange writing on the back?
- Do you recognise any of the symbols?
- What do you think it might say?
- Where do you think they were found?
- What civilisation do your think they belong to?
- How were they used in life?
- How were they used after death?
- Why is there a hole through them?
- Why was this tiny creature sacred?
- What do these animals eat and where do they lay their eggs?
- Do these animals live today?
- Were any preserved when they died?
- If so, how and why?
- What is an amulet?
- What other kinds of amulets did the Ancient Egyptians have?
- What did they protect you from?
Ask the children to do some in0-depth research using books on Ancient Egypt and educational websites, and report back with their findings.
The websites below provide useful background information and images on Ancient Egyptian amulets, including scarabs.
Background information from the John Hopkins Museum on Ancient Egyptian scarabs:
http://archaeologicalmuseum.jhu.edu/the-collection/object-stories/ancient-egyptian-amulets/scarabs/
Teaching History with 100 Objects pages from the British Museum. Excellent background information for teachers on Ancient Egyptian amulets, religion and everyday life… inspired by an eye of Horus amulet:
http://www.teachinghistory100.org/objects/about_the_object/eye_of_horus_amulet
http://www.teachinghistory100.org/objects/teaching_ideas/eye_of_horus_amulet
http://www.teachinghistory100.org/objects/for_the_classroom/eye_of_horus_amulet
http://www.teachinghistory100.org/objects/a_bigger_picture/eye_of_horus_amulet
Some scarab beetle amulets at the British Museum:
https://www.britishmuseum.org/collection/term/x7238
Information and images from the Metropolitan Museum about different types of Ancient Egyptian amulets:
https://www.metmuseum.org/toah/hd/egam/hd_egam.htm
Some fun scarab facts:
https://softschools.com/facts/animals/scarab_beetles_facts/2171/
Inspired by examples they’ve seen, the children create a scarab amulet in self-hardening clay, to help protect a mummy on the journey to the afterlife.
Look closely at photographs of real scarab beetles by googling ‘Egyptian scarab beetle’. Look at their different body parts. Google ‘parts of a scarab beetle’ for some labelled diagrams.
See how the Ancient Egyptians simplified the outline when they made amulets, for example, by showing the legs on the sides, if at all.
Look at several different Ancient Egyptian scarab amulets from Folkestone Museum and elsewhere. They vary enormously in the level of detail. Discuss how you might model one in self-hardening clay.
Materials needed:
- air drying clay
- blue or light green poster paint
- clay modelling tools
- modelling boards
- water (to stop clay drying out)
Simple instructions:
Look at real Ancient Egyptian scarab amulets for inspiration. Examples can be projected on the whiteboard.
Work on a modelling board. Try to touch the clay as little as possible, otherwise it will quickly dry out. If it starts to dry out too much it can be lightly sprayed with an atomiser.
Make the scarab at least 6cm long and 1cm thick to allow room for a good level of detail.
It should be oval-shaped with a rounded top and a flat bottom. You can use your hands to mould this basic shape. Then press it onto the board to give it a flat bottom.
Give it two wing cases, a thorax, head, eyes and six legs by scoring marks in the clay with your modelling tools. Remember, the legs are marked on the side of the amulet (not the top).
Carefully turn it on its side and carve one or two simple hieroglyphs on the bottom.
An adult may be able to assist by making a small hole through it, so it can be worn as a protective charm.
Leave it at least 24 hours to dry. When dry, it can be painted light blue or light green, to imitate faience, the attractive glassy glaze used by the Ancient Egyptians or left a terracotta or cream colour to represent stone.
Alternatively, here’s a link to some instructions for creating amulets out of salt dough.
https://www.activityvillage.co.uk/ancient-egypt-salt-dough-amulets

